This is your one-stop toolbox of open-ended crafts and online games that could be modified for use in almost any Sunday School lesson (or Bible class)! Below you’ll find three parts:
- Zoom Games (games that could be incorporated to fit any Sunday School lesson)
- Craft Videos (videos that could be played and re-purposed in a variety of ways during online Sunday School)
- Anytime Crafts (crafts that are open-ended, and could be used in nearly any Sunday School lesson).
Be sure to visit the companion posts: An Engaging Online Sunday School and Introduction to Sunday School – Videos Included. See also this year’s Sunday School homepage (covering David through the birth of Christ). We will be regularly posting videos and activities for each lesson that can be used in your virtual Sunday School classroom.
16 Open-Ended Zoom Games
- Sunday School Pictionary – Message the drawing player with what they are to draw related to the SS lesson. Set the timer. The player draws on either the zoom “whiteboard” (or on their own sheet of paper in view of the other players), and the other players guess what they drew.
- Scavenger Hunt Review – At the end of the lesson, have kids find something from their house that reminds them of the lesson. Have each child explain what their object is and what from the lesson it reminds them of.
- Group Activity Page – Use the Zoom “Screen Share” function to share an activity page (maze, fill in the blank etc), and have the kids use annotate to take turns or race to fill out the page.
- Charades – Classic game with a virtual twist. You can assign Bible Characters related to the lesson ahead of time, and have the kids produce a video to show during the zoom time together. Alternatively, you can message the kids their character and they act it out for the other students to guess (or the kids can come up with their own).
- 20 Questions – One player thinks of a person, place or thing related to the lesson and the rest of the players ask 20 yes or no questions to guess the answer.
- Who am I? – Choose a kid to be “it,” and briefly put them in a breakout room on their own. While they are gone, the rest of the kids decide on a character for that player to be. The player is brought back into the group and asks questions to find out who they are using only yes or no questions.
- Categories – Give the kids a category and a letter (eg women of the Bible starting with J), give the kids a minute to make a list. The kids should try to write down as many on their list, as possible, especially ones that they think others won’t think of. The kids will get one point for each “unique” item on their list (ie items that multiple kids have not listed).
- Sign Language Code – Send each of the kids a copy of the Sign Language “Alphabet.” Have one of the kids refer to the “alphabet” to spell out a word from the lesson, while the other kids refer to their copy to guess the word.
- Silence – Partway through the lesson, turn off the mic and have kids try to guess what you are saying.
- Would You Rather – Ahead of time, write out a shortlist of questions with 2 scenarios related to the lesson (ie Would you rather be Elijah or the widow woman of Zarapheth?) You could intersperse a couple Would you Rather’s in the middle of the lesson, or play it as a game at the end (and have the kids come up with their own too!)
- Memory – Use the Zoom “Screen Share” to show a picture related to the lesson (you can use “FreeBibleImages.org” or another related photo). Leave the photo up for the group for 30 seconds while the kids study the image. Once the photo is gone, give the kids a time limit to list every detail they can remember from the photo. You can also use this activity with lists of words.
- What’s in the Bag? – Put an object that is somehow related to the lesson in a bag, and describe it but don’t show it on the screen. Have the kids guess what the object is. This can be used to introduce the lesson, or in the middle of a lesson to break things up.
- Bible Mad Gab – Choose phrases from Bible passages related to the lesson and rewrite them with phonetically similar combinations for the kids to sound out and guess (eg “filled with wisdom” might be “Phil dew eth whizz dum.” Share them on zoom using the “chat” function.
BONUS – Movement Games for getting the blood flowing
- Simon Says – Appoint one kid to be “Simon” and have them give movement instructions (put your hand up, jump on one leg). However, kids should only follow the instructions if the leader remembers to say “Simon Says.”
- Opposites – Call out an instruction (eg, “shake your left leg” or “sit down”) and kids must do the opposite of what was said (eg they shake their right leg or stand up)!
- Statues – Play music for the group, but as soon as you pause the music the kids must standstill as a statue until you start the music again. The kids will enjoy trying out some funny statue poses!
Thank you to Dean M and Kate A for contributing to this game list!
5 Anytime Craft & Activity Videos
These craft videos were originally created for Book Road Vacation Bible School, but are open-ended so that they could be repurposed for nearly any Sunday School lesson!
10 Anytime Crafts
These crafts are also open-ended and could be paired up with nearly any Sunday School lesson!
Magnets or Necklaces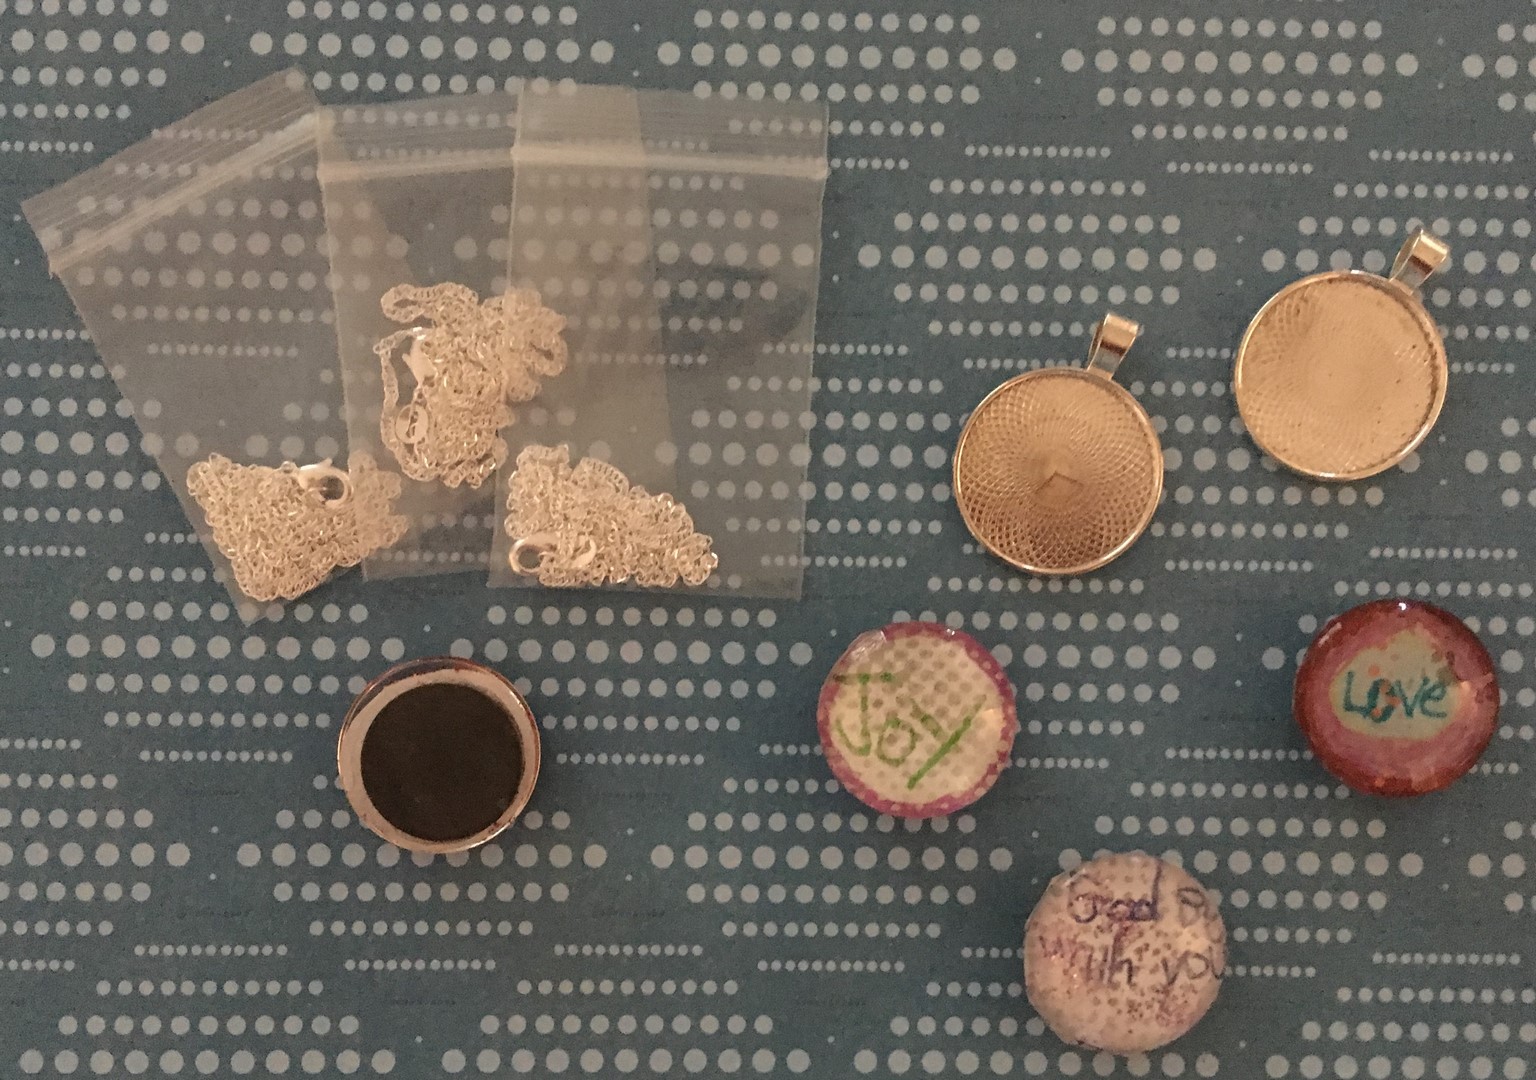
Magnet crafts are a huge hit for kids because they can keep them or give them away as practical gifts. Decorate a small circle of scrapbook paper to fit the theme of your class (eg draw a Bible word that matches the class theme or create a printable 1-inch circle template with a verse for the kids to decorate/colour). Using Modge Podge, glue the scrapbook creation to the back of a glass bead. Once this has dried, use E6000 glue to add a strong magnet to the back of the glass bead. Alternatively, purchase necklace sets to glue the glass bead right onto a necklace.
Materials List:
- E6000 glue (heavy-duty glue needed to glue the magnet to the back of glass bead. I bought this one.)
- Disposable Gloves (E6000 glue should just be handled by adults wearing gloves!)
- Modge podge (to glue glitter/scrapbook paper to the back of the glass beads)
- Glass beads (1 inch works well – I bought these ones)
- Magnets (3/4 inch is strong enough to hold the glass bead onto the fridge while still holding up a picture/paper. I purchased these ones.)
- Scrapbook paper (for decorating)
- Glitter
- Sharpie Markers (regular markers will bleed once the modge podge is added)
- Necklace kit (I used this one with great success – the kids loved making necklaces for their moms & grandmas)
Carbon Paper Crafts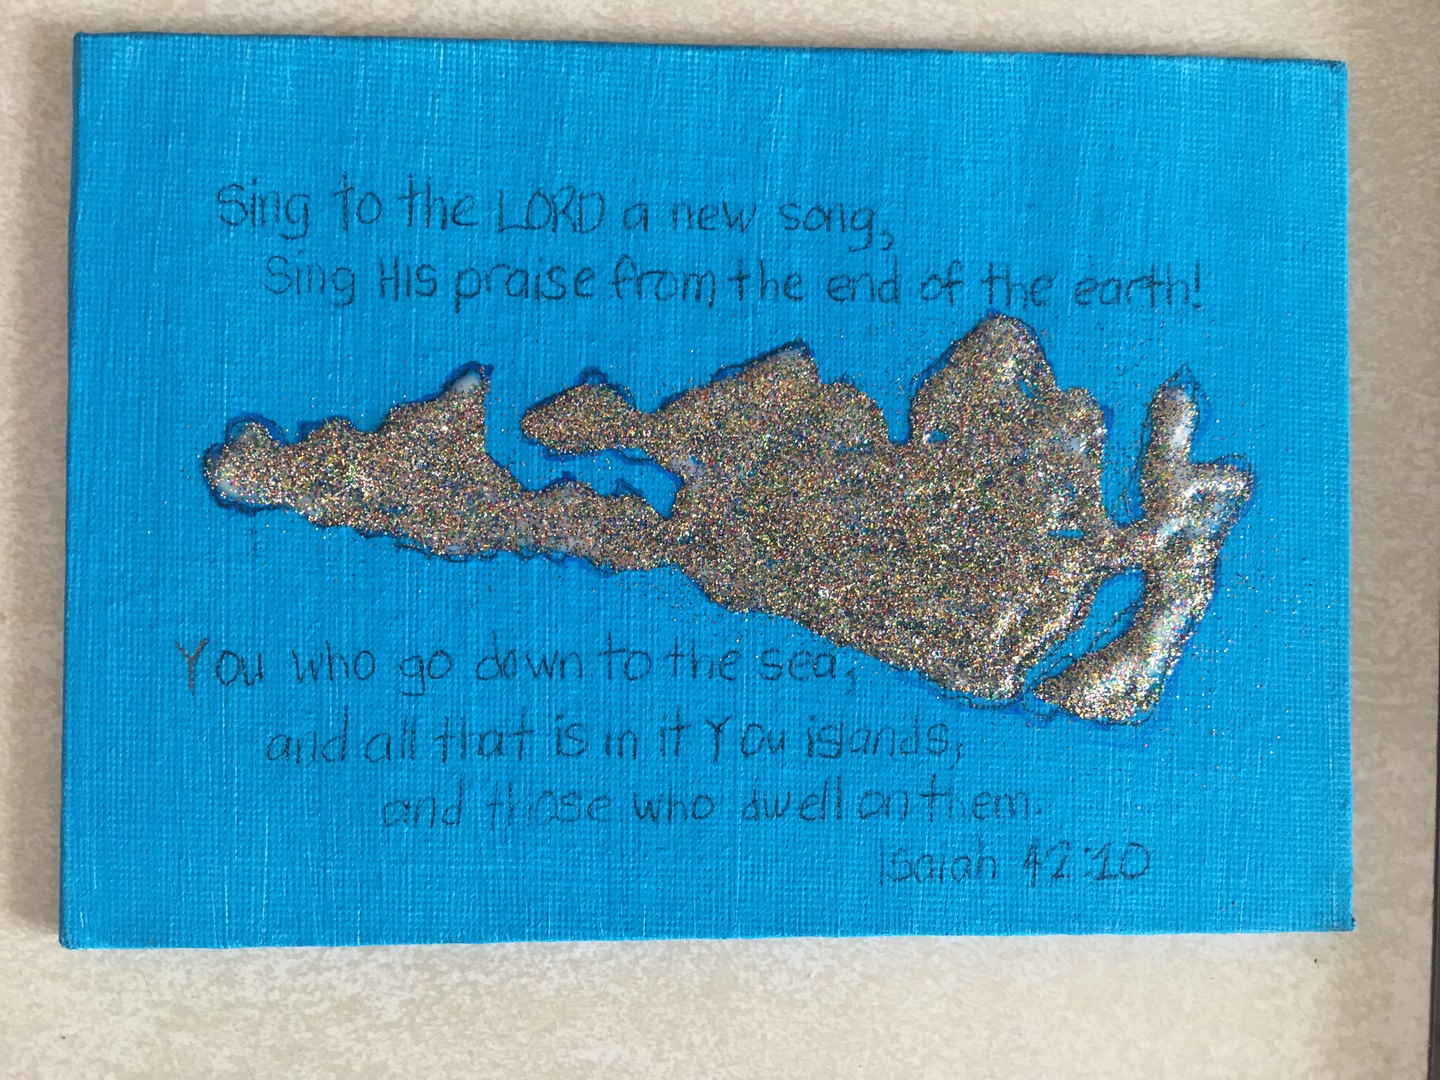
The sky is the limit with Carbon/Transfer Papercrafts. As a not very artistic person, I can’t believe I didn’t use carbon/transfer paper until this last year! When you use carbon/transfer paper you can copy any printable design onto a piece of wood, or canvas to then be able to paint/decorate.
For a class of 3-8 years old we did a carbon papercraft. For the children 3-6, I had drawn the design using carbon paper at home before the class. I let the 7-8 years draw their own design with the carbon paper which they did with ease. I later did the same craft with 9-10-year-olds at home and they also enjoyed the process of coping with their creation.
Carbon & Transfer are slightly different but are used for the same purpose – transferring an image/words from a piece of a computer paper to a different material. We have purchased both and both are effective. Carbon paper can smudge a bit more and is used up more quickly but is also A LOT more inexpensive. If you are doing a high-quality craft we would suggest transfer paper, but for most children’s crafts carbon paper will work just fine!
Once you make a design you like on the computer, print it off. Then put the carbon/transfer paper between your piece of computer paper & the material you would like to have the finished design on (say a piece of wood or canvas) – using a pencil go over all the words/design gently. This will “transfer” the design from the computer paper to the wood/canvas. I found it helpful to tape down the piece of computer paper & carbon/transfer paper so it didn’t accidentally shift during the copying process.
Once you have your designed transfer you can then go over it with sharpies or paint to make it look complete.
Materials List:
- Carbon Paper (Amazon sells 200 sheets for just under $10 USD: www.amazon.com/Sheets-Carbon-Transfer-Tracing-Surfaces/dp/B07G8VXF4X/)
- Printed template to be traced
- Wood, canvas, or other product for tracing onto.
- Pencil for tracing
Beading
All kids seem to enjoy making bead creations. Beads can be ordered online, or as easily available at Dollar Stores or Wal-mart. I have found alphabet beads the most affordable when ordered online.
For younger children, pipe-cleaner bracelets are a simple, fast way to make a bracelet. For older children, you could buy an elastic cord to make stretchable bracelets.
It is easy to choose keywords from Bible lessons to incorporate into the beading craft.
Shrinky Dinks
Shrinky Dinks are a real class favourite. They are very easily customization for any Bible class topic – just print off clipart pictures or words for kids to trace onto their shrinky dink paper. We have found that Dollar Stores are even selling Shrinky Dink paper now. We highly suggest having a hole puncher on hand to punch a hole through the creation before you shrink them down. This allows the kids to attach their craft to backpacks, Bible cases, necklaces etc.
Materials List:
- Shrinky Dink paper (craft store or Amazon): www.amazon.com/Shrinky-Dinks-Creative-Sheets-Frosted/dp/B00Z0P39SK/
- Printed template to trace
- Thin Permanent Marker for tracing
- Thin permanent markers of coloured pencils for colouring
- Hole Punch
- Key Chain Rings or Necklace string
- Toaster oven
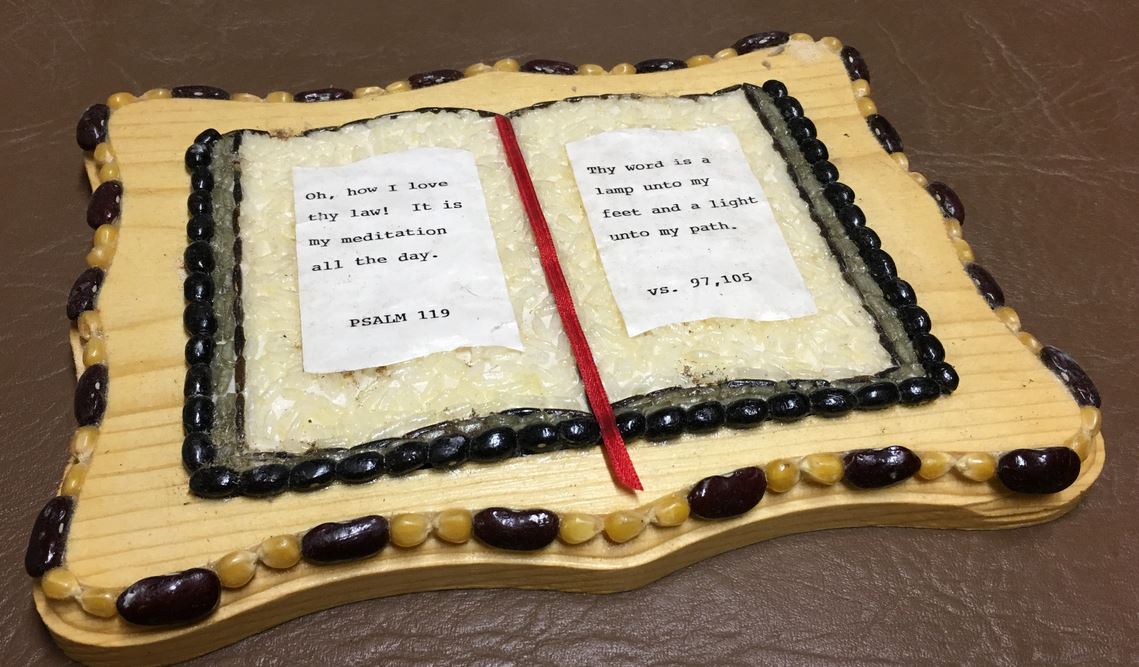
Bean & Noodle Bible Verse Plaques – See www.magnifyhimtogether.com/2019/07/16/bible-plaque-craft-idea/
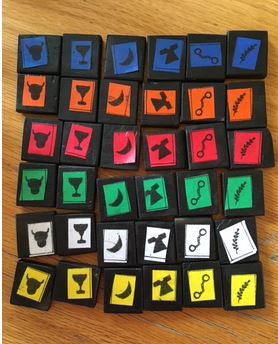
Qwirkle Bible Game – See www.magnifyhimtogether.com/2019/05/21/qwirkle-themed-bible-game/
Glad Wrap Painting – See www.magnifyhimtogether.com/2018/06/14/glad-wrap-painting/
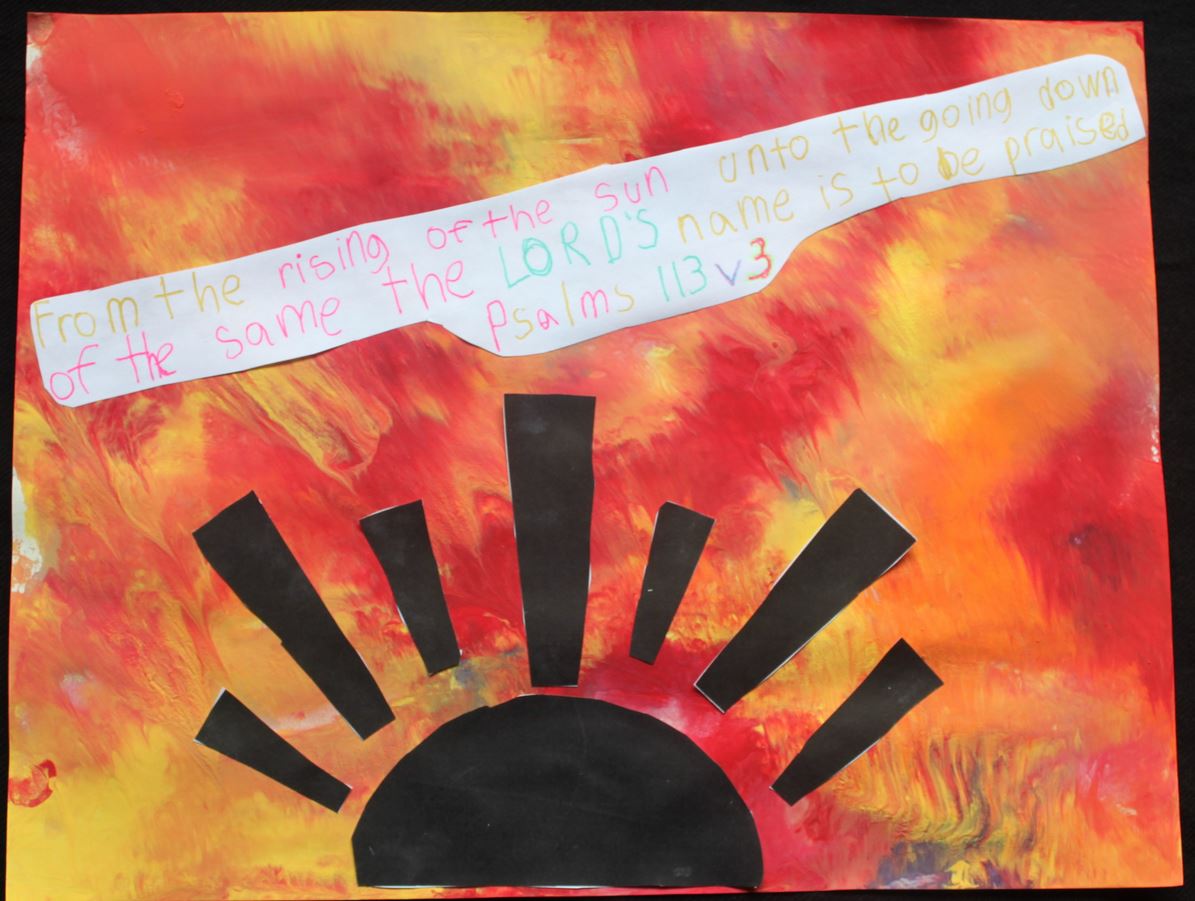
Canvas Craft – See www.magnifyhimtogether.com/2018/11/01/the-story-of-job/
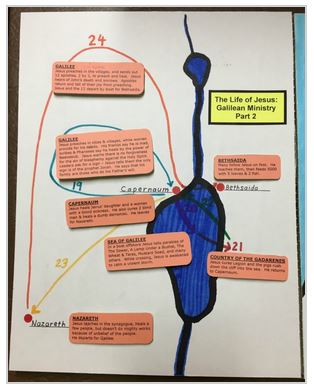
Map Craft – See www.magnifyhimtogether.com/2019/07/09/creating-bible-maps-with-children/